 +91 72929 29159














The Container Is Not the Risk. The Unknown Is.
A drum is moved from one corner of the plant to another.
A container is opened for a routine transfer.
A chemical bottle is picked up from storage.
A cylinder is shifted closer to the work area.
From the outside, these tasks may look ordinary. But with hazardous materials, the real risk is not always visible on the container. It may be hidden in the vapour, the pressure, the reaction, the incompatibility, the exposure route, or the way the material is handled.
This is where many hazardous material handling mistakes begin.
Not because workers intentionally ignore safety, but because routine work starts feeling too familiar. A material name is known, but the hazard is not fully understood. A label is present but not read properly. An SDS exists but is not used before the task. PPE is worn but not matched to the exposure.
So, how to handle hazardous materials safely at the workplace?
The answer is not one step. It is a system.
Safe handling of hazardous materials requires correct identification, SDS review, label verification, hazard classification, PPE selection, proper storage, container inspection, spill response planning, worker training, hazard reporting, and continuous improvement.
Hazardous material safety improves when people, procedures, training, and digital systems work together.
What Are Hazardous Materials?
Hazardous materials, also called hazmat materials or hazmat, are substances or articles that can create risk to people, property, equipment, or the environment if they are not handled, stored, transported, or disposed of correctly.
The hazmat meaning is simple: it refers to materials that can be dangerous because of their chemical, physical, biological, radiological, or environmental properties. A common hazmat definition includes materials that may be flammable, corrosive, toxic, reactive, explosive, oxidizing, pressurized, infectious, radioactive, or environmentally hazardous.
In workplace terms, hazardous materials may include:
- Flammable liquids and gases
- Corrosive acids and alkalis
- Toxic chemicals
- Solvents, paints, coatings, and adhesives
- Compressed gas cylinders
- Oxidizers and reactive substances
- Pesticides and cleaning chemicals
- Fuels, oils, and lubricants
- Batteries and lithium batteries
- Process chemicals and laboratory reagents
- Contaminated waste, spill residue, or chemical sludge
OSHA’s Hazard Communication Standard requires chemical manufacturers and importers to classify chemical hazards and requires employers to provide workers with hazard information through a hazard communication program, labels, safety data sheets, and training.
Why Hazardous Material Handling Needs a Structured Approach
Hazardous material handling is not just “material handling with more PPE.”
It is a controlled safety activity because the consequences of error can be serious. A wrong transfer method can create a spill. Poor storage can lead to incompatible mixing. A missing label can delay emergency response. A damaged container can release vapours. Incorrect PPE can expose workers through inhalation, skin contact, or eye contact.
Hazard Communication continues to be one of OSHA’s most frequently cited standards, which shows that chemical and hazardous material information, labelling, SDS access, and training remain common compliance and workplace safety challenges.
A strong hazardous material handling process should answer these questions before work begins:
- What is the material?
- What are the hazmat hazards?
- What does the SDS say?
- What does the label or hazard class indicate?
- What PPE is required?
- Is the container safe and compatible?
- Is the material stored properly?
- Are incompatible materials segregated?
- Is spill response equipment available?
- Are workers trained?
- Is there a system to report unsafe conditions
This is why proper handling of hazardous materials starts long before the container is touched.
Step 1: Identify the Hazardous Material Correctly
Before deciding how to handle hazardous materials, the first step is to know exactly what the material is.
This sounds obvious, but many incidents begin with assumptions:
- “We have used this chemical before.”
- “This drum looks like the usual one.”
- “It is just waste.”
- “It is only a small quantity.”
- “The smell is normal.”
- “The old label is probably correct.”
Hazardous material identification should consider:
- Product name or chemical name
- Manufacturer or supplier information
- SDS details
- Label and pictograms
- Hazard class or category
- Physical state: solid, liquid, gas, vapour, dust, or mist
- Concentration and quantity
- Storage and handling history
- Process source, contamination, or waste status
For transportation, PHMSA materials reference the hazardous materials table and hazard class or division information under 49 CFR requirements. This matters when hazardous materials are shipped, transported, packaged, labelled, or documented beyond internal site handling.
Key point: You cannot control a hazard that has not been identified correctly.
Step 2: Review the SDS Before Handling
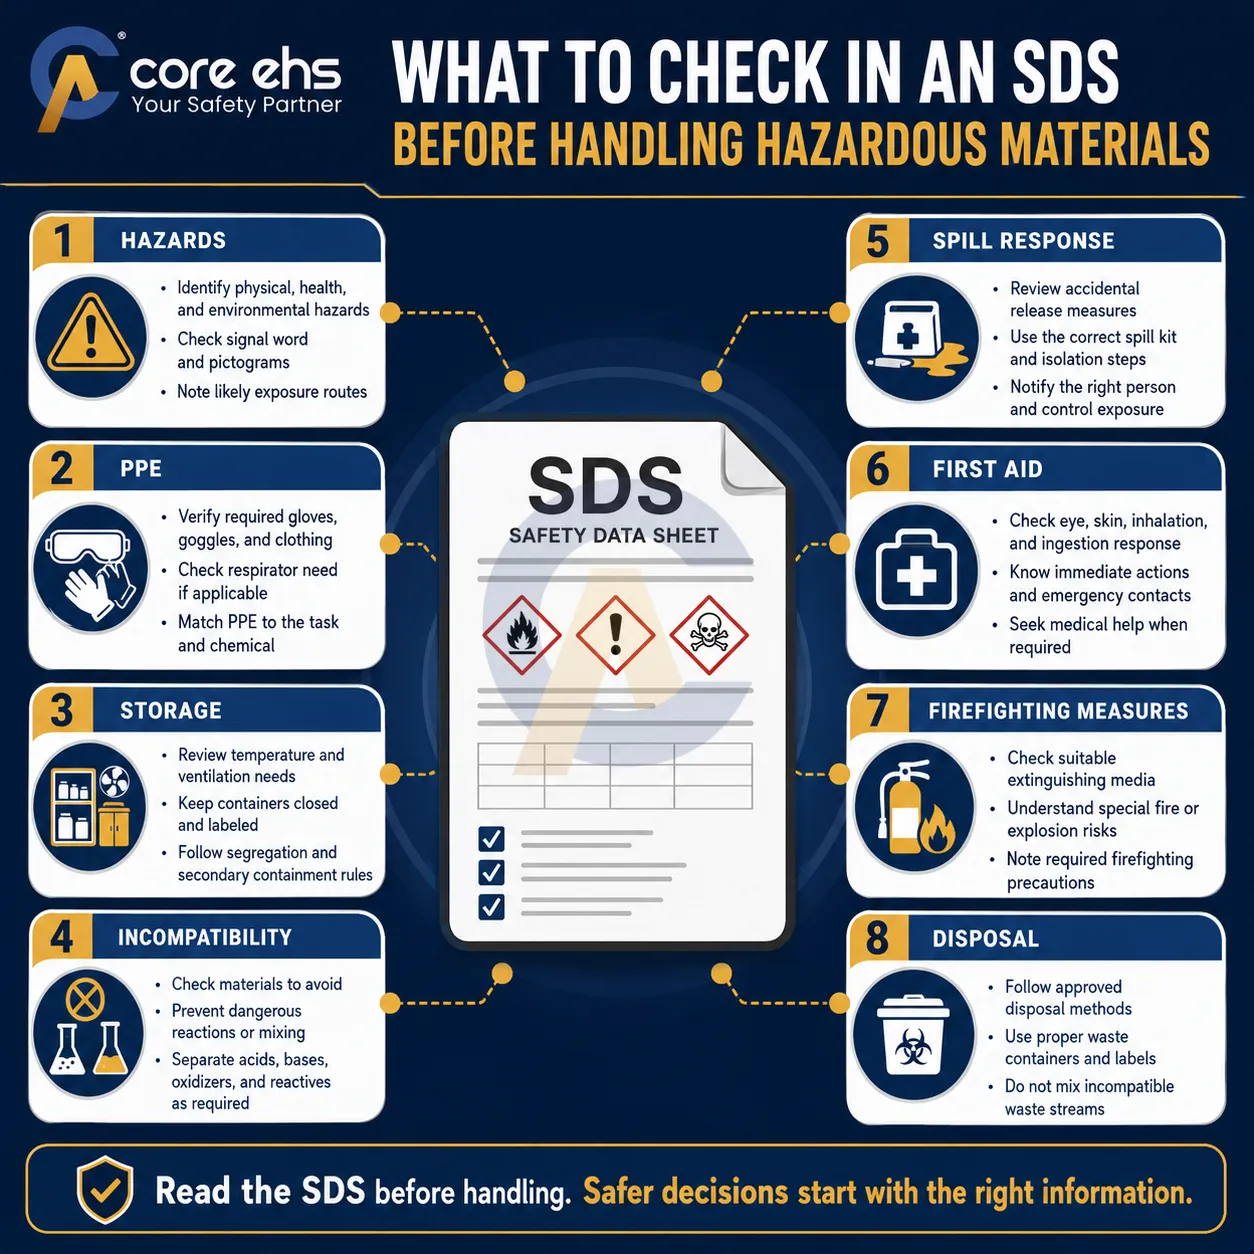
The Safety Data Sheet, or SDS, is one of the most important tools for hazardous material safety.
The SDS provides structured information about the material, including:
- Hazard identification
- Composition and ingredients
- First aid measures
- Firefighting measures
- Accidental release measures
- Handling and storage
- Exposure controls and PPE
- Physical and chemical properties
- Stability and reactivity
- Toxicological information
- Disposal considerations
- Transport information
OSHA states that Safety Data Sheets, formerly known as Material Safety Data Sheets or MSDSs, are used to communicate the hazards of hazardous chemical products. The SDS format includes required information such as hazard identification and label elements.
This is where MSDS software or SDS management software becomes useful. In many organizations, SDS documents are available, but not always easy to find during actual work. A digital MSDS software system can help teams organize, search, access, and update SDS records across sites, departments, and shifts.
For workers, supervisors, contractors, and emergency responders, fast SDS access can make hazardous material handling more informed and more controlled.
Step 3: Check Labels, Symbols, and Hazard Classes
Labels are not decoration. They are fast hazard communication tools.
A hazardous material label may show the product identifier, signal word, hazard statements, precautionary statements, supplier details, and hazard pictograms. OSHA’s Hazard Communication information explains that labels include elements such as signal words, pictograms, and hazard statements for hazard classes and categories.
Workers should verify:
- Is the label readable?
- Does the container name match the SDS?
- Are hazard symbols or pictograms understood?
- Is the hazard class clear?
- Are secondary containers labelled?
- Are damaged, faded, or missing labels reported?
- Are incompatible materials marked and segregated?
A label should help workers understand whether the material is flammable, corrosive, toxic, reactive, oxidizing, compressed gas, or environmentally hazardous.
In high-risk workplaces, label verification should be treated as a pre-task safety step, not as a documentation formality.
Key point: If the label is unclear, the risk is unclear.
Step 4: Understand the Nine Hazard Classes for Fully Regulated Items
Many searches around hazmat ask: how many hazard classes for fully regulated items?
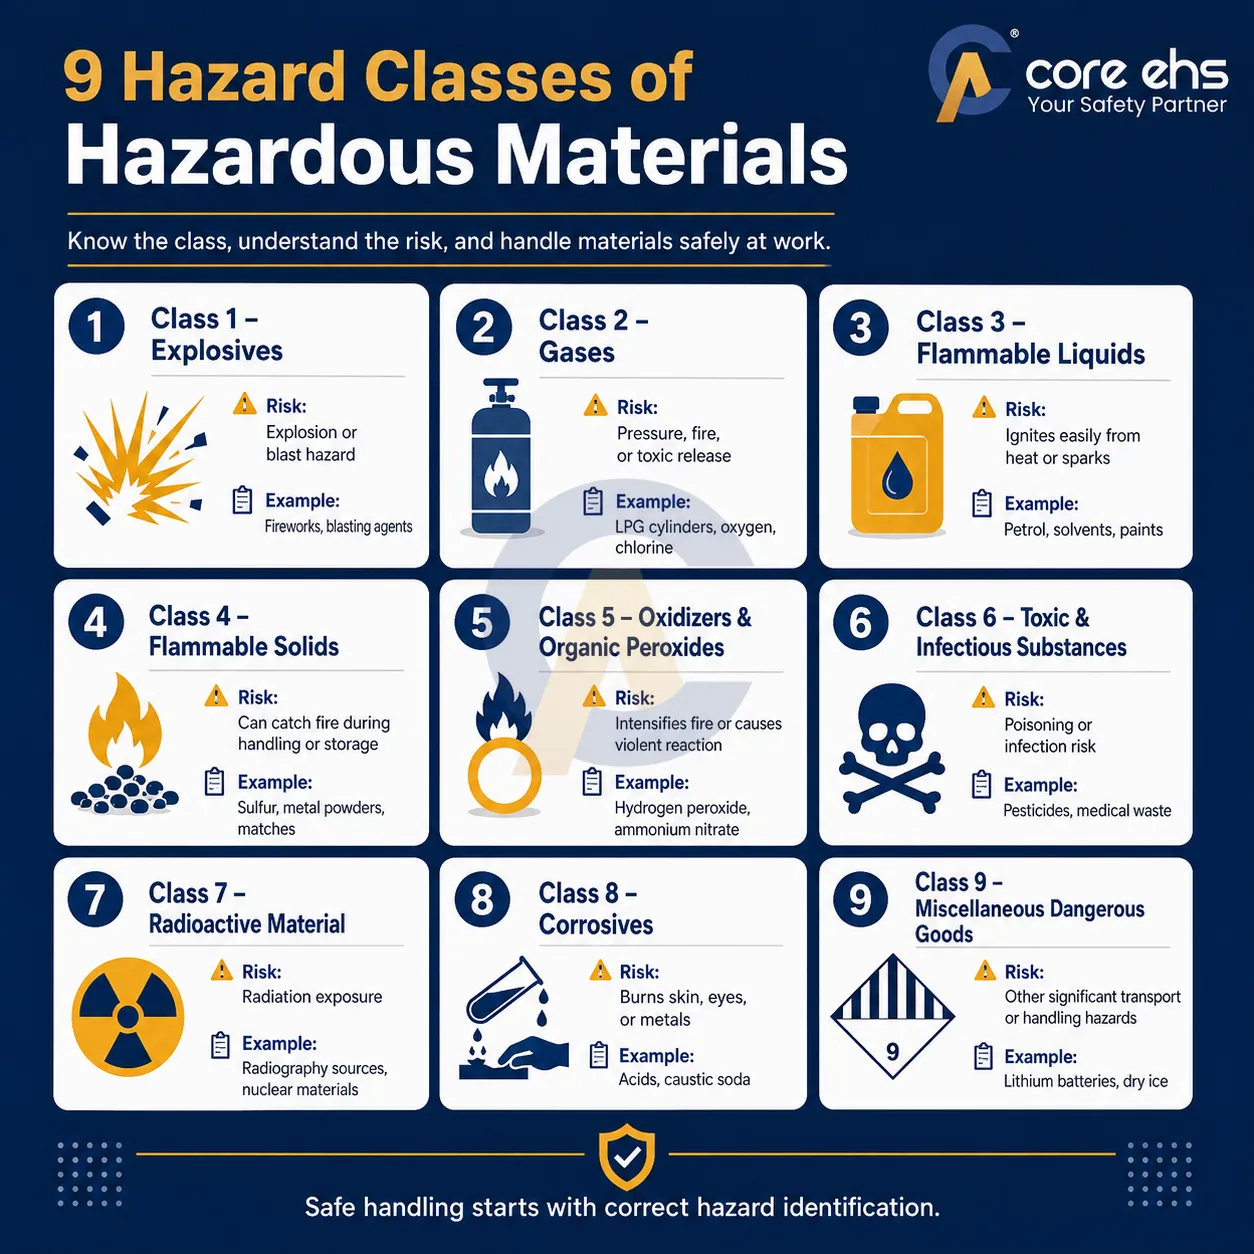
There are nine hazard classes used in hazardous materials transportation:
- Explosives
- Gases
- Flammable liquids
- Flammable solids
- Oxidizers and organic peroxides
- Toxic and infectious substances
- Radioactive materials
- Corrosives
- Miscellaneous hazardous materials
PHMSA’s hazmat training material includes the “definition of the nine hazard classes” as part of hazardous materials training program development.
For workplace handling, these classes help build hazard awareness, but they should not be the only control reference. Workers must still review the SDS, exposure conditions, storage compatibility, PPE requirements, and emergency response steps.
Step 5: Select PPE Based on the Hazard, Not Habit
One of the most common hazardous material handling mistakes is using generic PPE for every task.
The same gloves, goggles, respirator, apron, or face shield may not protect against every hazardous material exposure.
PPE selection should be based on:
- Chemical properties
- Exposure route: inhalation, skin, eyes, ingestion, injection
- Task duration
- Splash or vapour potential
- Concentration
- Temperature and pressure
- SDS recommendations
- Compatibility of glove or suit material
- Respiratory protection requirements
- Emergency response needs
NIOSH’s hierarchy of controls places PPE as the last line of defense when other control methods cannot reduce exposure sufficiently. This means PPE is important, but it should not replace elimination, substitution, engineering controls, ventilation, isolation, or safe work procedures.
For hazardous materials handling, PPE should be hazard-specific and task-specific.
Key point: PPE should match the material, not the habit.
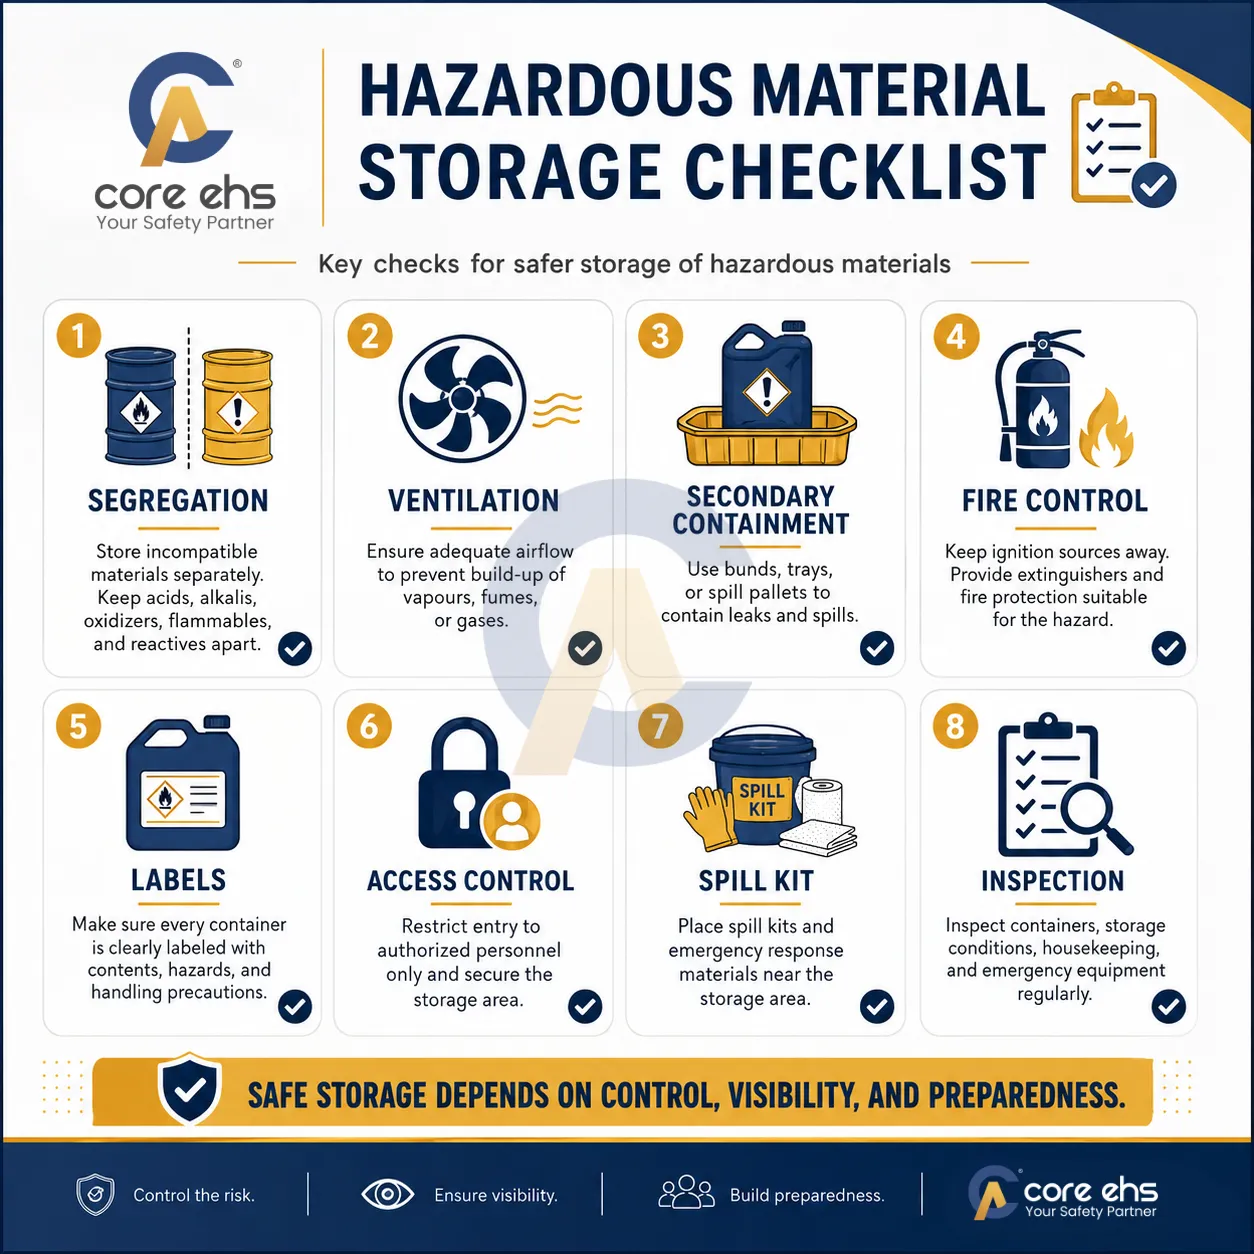
Step 6: Store Hazardous Materials Safely
Hazardous material storage is one of the most important parts of material handling safety.
Improper storage can create fire, exposure, spill, reaction, and compliance risks. A hazardous material storage area should be designed and maintained to control hazards, not simply to keep containers out of the way.
Safe hazardous material storage should include:
- Segregation of incompatible materials
- Proper ventilation
- Secondary containment
- Fire protection
- Spill kits and emergency equipment
- Weather protection
- Restricted access
- Clear labelling and signage
- Stable stacking and storage arrangements
- Regular inspection
- Housekeeping controls
- Updated inventory
OSHA’s construction standards include a dedicated subpart for materials handling, storage, use, and disposal, reinforcing that storage and material handling are part of safety control, not just logistics.
How to handle hazardous materials on a construction site also needs extra attention because site conditions change frequently. Chemicals, fuels, paints, cylinders, solvents, adhesives, and coatings may be stored near work areas, temporary structures, hot work, electrical sources, vehicles, and open weather conditions.
Construction sites should verify:
- Materials are stored away from ignition sources.
- Drums and containers are stable and protected.
- Cylinders are secured.
- Flammables are stored in suitable cabinets or controlled areas.
- SDS access is available to workers and supervisors.
- Spill kits and emergency response equipment are nearby.
- Contractors understand site-specific hazardous material rules.
Step 7: Inspect Containers Before Handling
Before hazardous materials are moved, opened, transferred, or stored, containers should be inspected.
Look for:
- Leaks
- Corrosion
- Cracks
- Bulging
- Missing caps
- Damaged valves
- Faded or missing labels
- Rusted drums
- Stains near the container
- Strong odours
- Incorrect or makeshift containers
Damaged or unlabelled containers should not be treated as routine. They should be reported, isolated where necessary, and handled based on site procedure.
For hazardous material handling, a container is not just packaging. It is the first barrier between the material and the worker.
Key point: If the container is compromised, the control is compromised.
Step 8: Use the Correct Handling Tools and Transfer Methods
Safe handling of hazardous materials also depends on how the material is moved, lifted, opened, transferred, pumped, or dispensed.
Unsafe practices may include:
- Dragging drums manually
- Rolling containers without control
- Lifting heavy chemical containers without support
- Moving cylinders without trolleys or caps
- Using makeshift funnels or pumps
- Transferring liquids without bonding or grounding where required
- Decanting into unlabelled containers
- Handling pressurized containers casually
- Pouring chemicals without spill trays or secondary containment
Proper handling may require:
- Drum trolleys
- Cylinder carts
- Approved pumps
- Lifting aids
- Spill trays
- Grounding and bonding equipment
- Closed transfer systems
- Local exhaust ventilation
- Compatible containers
- Controlled dispensing areas
Hazardous material handling should never depend only on worker strength or experience. The handling method must match the material, container, and task.
Step 9: Prepare for Spills, Leaks, and Exposure
The best time to plan for a spill is before the spill happens.
Workers should know:
- Where spill kits are located
- Which spill kit is suitable for the material
- How to report a spill
- When to evacuate
- Where eyewash stations and emergency showers are located
- What first aid steps apply
- Which PPE is needed during cleanup
- Who is authorized to respond
- When emergency services or specialist responders are required
SDS Section 6 usually covers accidental release measures, while Section 4 covers first aid and Section 5 covers firefighting measures. These sections should be part of practical hazardous material training, not just a document reference.
Hazardous material safety improves when workers are trained to recognize early warning signs:
- Small leaks
- Unusual odours
- Damaged containers
- Poor ventilation
- Missing labels
- Unsafe storage
- Wrong PPE
- Spill residue
- Incompatible materials kept together
This is where Hazard Reporting Software can help. Workers should be able to report unsafe conditions quickly using mobile or web-based tools. Safety teams should be able to assign corrective actions, track closure, and review repeated issues.
A reported hazard is not a complaint. It is an opportunity to prevent exposure, spill, fire, or release.
Step 10: Train Workers With Practical, Visual, and Repeatable Learning
Hazardous materials training should go beyond definitions.
Workers must understand:
- What hazardous materials are
- What hazmat hazards exist in their work area
- How to read labels and SDS
- How to select PPE
- How to handle toxic substances
- How to store hazardous materials
- How to identify incompatible materials
- How to inspect containers
- How to respond to spills and exposure
- How to report unsafe conditions
- What not to do during emergencies
OSHA’s Hazard Communication Standard requires employers to provide effective information and training on hazardous chemicals in the work area at initial assignment and when new chemical hazards are introduced.
This is where CORE-EHS service integration becomes valuable.
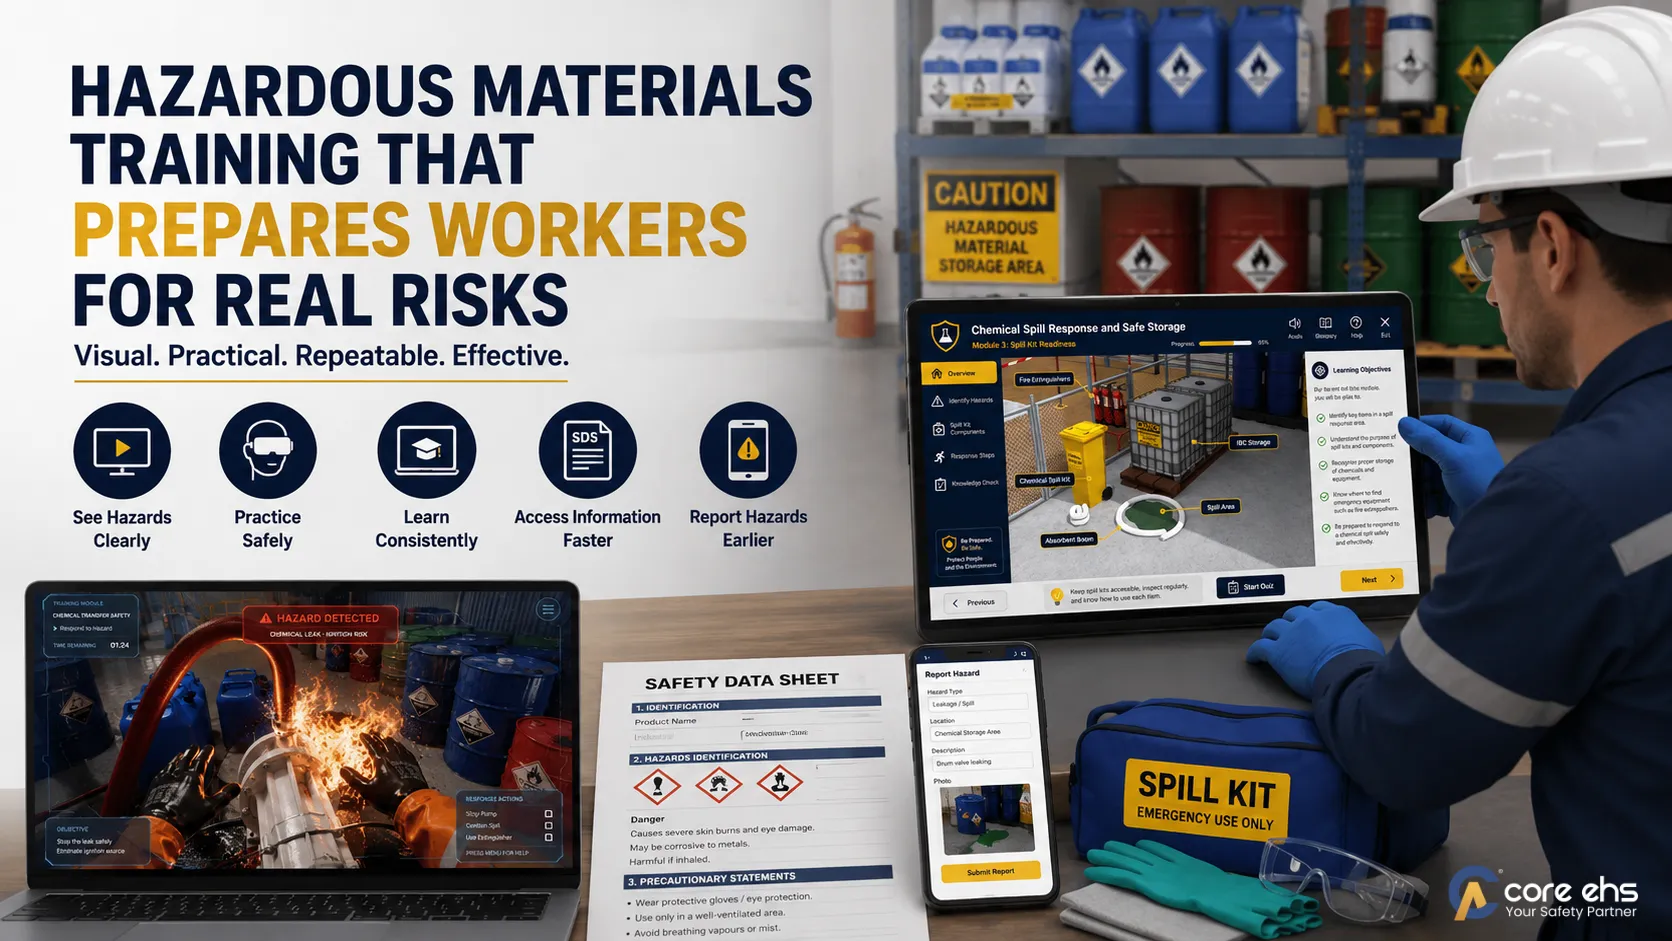
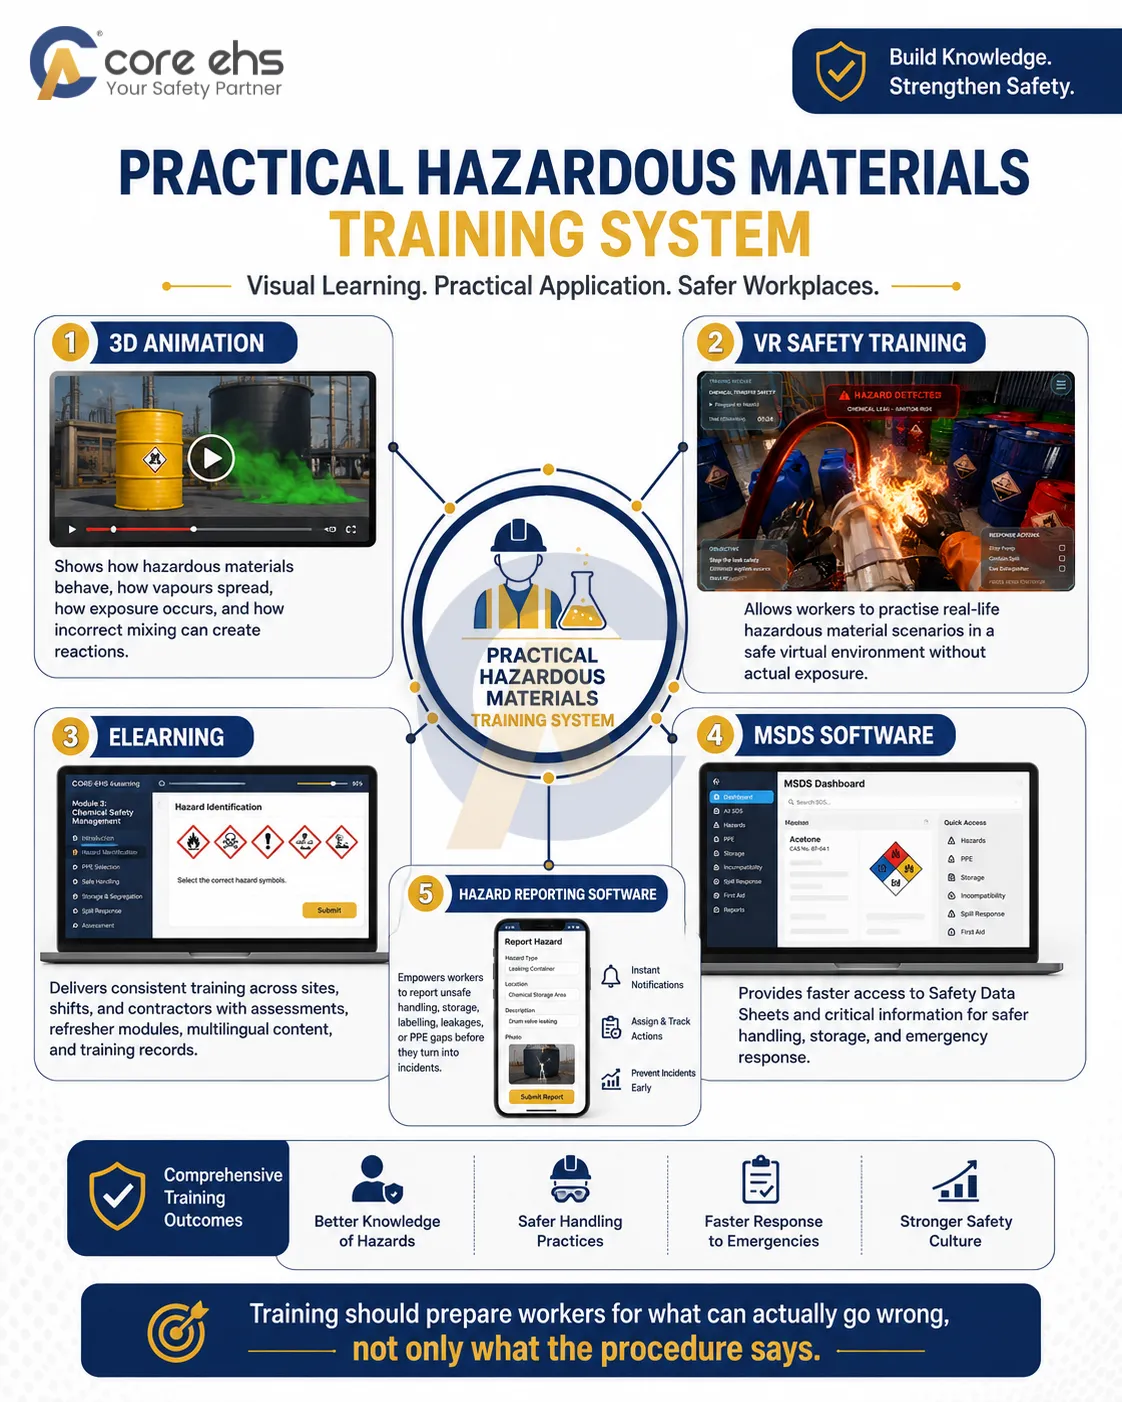
3D Animation for Hazardous Materials Training
3D animated safety videos can show how hazardous materials behave, how exposure occurs, how vapours spread, how incorrect mixing creates reactions, and how controls prevent incidents. This is especially useful when hazards are invisible or difficult to explain through classroom training alone.
VR Safety Training
VR training can place workers inside realistic hazardous material handling scenarios without exposing them to actual danger. Workers can practise opening drums, handling cylinders, responding to leaks, identifying labels, selecting PPE, or managing emergency actions in a controlled virtual environment.
eLearning for Consistent Training
eLearning helps organizations deliver consistent hazardous materials training across multiple sites, departments, shifts, and contractors. It supports refresher learning, assessments, multilingual content, and training records.
MSDS Software and Hazard Reporting Software
Software helps convert information into action. MSDS software supports faster access to safety data sheets, while Hazard Reporting Software helps workers report unsafe handling, storage, labelling, leakage, or PPE gaps before they become incidents.
Key point: Training should prepare workers for what can actually go wrong, not only what the procedure says.
Step 11: Build a Hazardous Material Handling System
Safe handling of hazardous materials should not depend on one checklist or one training session.
A stronger hazardous material handling system includes:
- Hazard identification
- SDS access
- Label verification
- Hazard classification
- PPE selection
- Storage and segregation
- Container inspection
- Safe transfer methods
- Spill response readiness
- Worker training
- Hazard reporting
- Corrective action tracking
- Periodic safety review
This is the difference between having information and using information.
A worker may know the chemical name. But does the worker understand the exposure route?
A supervisor may know the SDS exists. But can the team access it quickly?
A site may conduct training. But is it practical enough for actual tasks?
A hazard may be noticed. But is it reported and closed?
The best hazardous material safety systems connect training, information, reporting, supervision, and corrective actions.
Practical Checklist: How to Handle Hazardous Materials Safely
Before handling hazardous materials, ask:
- Have we identified the material correctly?
- Have we reviewed the SDS?
- Is the label clear and accurate?
- Do we understand the hazard class?
- Are workers trained for this material and task?
- Is the correct PPE available and suitable?
- Is the container compatible and undamaged?
- Are incompatible materials segregated?
- Is the storage area controlled?
- Are proper handling tools available?
- Is ventilation adequate?
- Is spill response equipment ready?
- Are eyewash and emergency shower facilities accessible where required?
- Are reporting and emergency steps clear?
- Is the task supervised or authorized if high risk?
Conclusion: Hazardous Material Handling Is a System, Not a Habit
Hazardous material handling becomes risky when routine work starts replacing verification.
A familiar container can still leak.
A known material can still react.
A small quantity can still expose a worker.
A stored chemical can still become unsafe if compatibility is ignored.
A trained worker can still make mistakes if information is not accessible at the point of work.
So, how to safely handle hazardous materials?
Start with the material. Understand the hazard. Read the SDS. Verify the label. Select the right PPE. Store it correctly. Inspect the container. Use proper handling tools. Prepare for spills. Train workers practically. Report unsafe conditions early.
CORE-EHS supports organizations with hazardous materials training, 3D animated safety videos, VR safety training, eLearning modules, MSDS software, and Hazard Reporting Software to strengthen hazardous material safety across industrial workplaces.
Because safe hazardous material handling is not only about being careful.
It is about building a system that helps workers make safer decisions every time.